Tag Archives: images

Five Tip Friday ~ Universal Clipboard, Markup, and Safari tips for Mac


img_5920

1/ Set up and use Universal Clipboard — The new Universal Clipboard feature in macOS Sierra and iOS 10 allows you to copy content, including text, images, photos and video from one Apple device and paste it in another. For example, you can browse a recipe on your Mac and paste the ingredients right to the grocery list on your iPhone. In theory, all you have to do is make sure all your Mac and iOS devices are on the same Wi-Fi network and that Bluetooth is enabled on your iPhone and/or iPad. Copy on one, choose Paste on the other … but if you can’t make this work (and there can be a lag between the cCopy then the ability to Paste), try signing out of iCloud on all of your devices, and then signing back in.

2/ Use Markup in macOS Sierra Photos — If you’re editing your images within Photos, you can apply filters, remove red-eye, crop things and so on. But macOS Sierra added Markup to Photos, which lets you add text boxes, shapes or drawings to your images.
Select the picture you’d like to annotate, then click the edit button in the toolbar (it looks like a set of sliders). In edit mode, you’ll see a list of tools along the side. Click on Extensions and the Markup option appears. Click this and you can add circles or stars around people, insert text boxes and more.

3/ Reopen recently used tabs in Safari — Launch Safari for Mac and in the Mac’s menu bar for Safari, and the obvious way is to click History. From the list of options with the History menu item, slide down to select Recently Closed. Hovering over this menu item produces a new contextual menu that shows all recently-closed Safari tabs. Select the item that you wish to reopen and click on it. You probably – hopefully! – knew that, but there’s a faster way to do it:

4/ Reopen recently used tabs in Safari (2) —To the right hand side of any open tab in Safari there is a Plus(+) icon. Clicking this opens a new Safari tab window. However, if you right-click (or hold down the Control key on your keyboard and normal-click) on the Plus(+) icon, a new menu appears that shows all recently-closed tabs. Select one to launch it.

5/ Turn Flash off for sites except for some — Flash sucks – it’s a resource hog, can allow malware in and it’s generally unpopular for good reason. So let’s take control of it. First, open any sites where you know you still need to use Flash (which allows those little web animations to play.) There are alternatives to Flash, and many sites including YouTube, have switched to the much better, higher resolution and faster HTML5. But if you’re stuck with needing some sites that still use Flash, read on.
On your Mac, open Preferences>Security>Plug-in Settings… and choose Adobe Flash Player. Set ‘When visiting other websites’ to Off to cause all other servers to send you HTML 5 instead (this is faster, more secure) content when available. But you can choose from among your open sites to give them permission to use the Flash plug-in and Safari will remember your choice for your next visit.

Five Tip Friday ~ Images, instant video, locked images in the trash, on SD cards


iClShLib

1/ How to create an iCloud Shared Album — iCloud Photo Library stores every photo and video you make, then keeps them up to date on all your OS X and iOS devices. Any edits you make are automatically updated everywhere. And iCloud Photo Sharing makes it easy to share those photos and videos with others – you know, you have a batch of photos, you want Aunt Mary to see them, but she lives in Glasgow and you line in Porirua ….
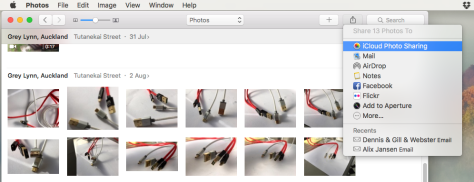
— Open the Photos app on your Mac, iPhone, or iPad and select one or more photos.
— Click on the Share Icon, then choose iCloud Photo Sharing.
A new window will pop up. You can add a caption or comment to the photos.
— Click New Shared Album. (If you’re setting up your Shared Album in iOS, you’ll tap Shared Album first, and then New Shared Album.)
— Name your iCloud Shared Album.
Now you can invite the folks you wish to share it with by using the box in the middle. You can invite people via their email address or iMessages number, or select names from your Contacts list.
When the info is all filled out, click Create, and you’re good to go. You can continue to add photos to your Shared Album, and they’ll beavailable to those you invited when you created the album (from Apple World Today).

2/ Use a keyboard shortcut for Display Mirroring — There’s a keyboard shortcut you should learn—Command-F1. This combo turns display mirroring off and on, so if you need to temporarily see your Dock or your open windows on both displays, it’ll let you do that. This is just a quick way to, well, mirror the functionality of System Preferences>Displays>Arrangement>Mirror Displays.
To put things back the way you had them, press Command-F1 again.
(f this doesn’t seem to be working for you, check out your options at System Preferences>Keyboard, under the Keyboard tab. There’s a checkbox there for Use all F1, F2, etc. keys as standard function keys  and if that’s on, the keyboard shortcut will be Function-Command-F1 instead.)

3/ How to delete locked images in Image Capture — Sometimes when you’ve mounted a memory card through a Mac’s SD Card slot or an external card reader, but the card’s tiny lock switch has been flipped on, often by mistake.
Eject the card, then flip the switch to the unlocked position, then mount again. The locks should be gone. If they remain, the card may be damaged. SD cards are tiny computers that manage the wear pattern on what is effectively an SSD. If the on-board chip determines it can’t write data, the only indication would be these locks in Image Capture.
You can copy all the media off and try reformatting in a camera, but if that fails, the card has gone bad.

4/ Record video directly into iMovie in OS X — Start a new project and open the Import window by clicking the Import button in the toolbar. (If you don’t see the Import button, click the Media button in the toolbar, and then click the Import button. If the Image Capture, Photos, or iPhoto window appears, close the window.
In the Cameras section of the Import window sidebar, select the built-in camera. A live video image from the camera appears in the Import window. To specify the event you want to record into, do one of the following:
Choose an existing event — click the Import to pop-up menu at the top of the Import window and choose the event.
Create a new event — Click the Import to pop-up menu, choose New Event, type a name for the new event, and click OK.
Choose the open project — Click the Import to pop-up menu and choose Project Media.
To start recording from the selected camera, click the Record button below the live video image. A new clip is created for each recording. You can repeat this process as many times as necessary. To stop recording, click the Record button again. To end the recording session and return to the iMovie main window, click the Close button.

5/ Deleting locked images from Trash — This one’s a bit complicated. The file permissions associated with trash can get out of whack, making it impossible for OS X to write new files to the Trash folder, but OS X doesn’t have a friendly way to repair it, even though your Mac knows enough that it can’t write to the folder.
The underlying Unix directory for files en route to deletion isn’t global but is located in each user’s home directory. This is transparent to you when using OS X unless the permissions for the directory become messed up. In that case, because OS X can’t move the items you want to delete into this temporary location, you’re prompted to delete files or folders immediately. (You’ll see this warning when deleting files from mounted fileservers, too, for the same reason.)
You can solve this via the Terminal although you need to be even more careful than usual in entering a command there, as you could delete other files if you don’t copy and paste (or, type in) the exact sequence—it won’t just fail, but could delete parts of your drive.
So copy and paste!
With that warning in mind, follow these steps when logged into your account, which has to have administrative privileges for this to work:
Launch Application > Terminal.
At the command prompt type (or, preferably, copy and paste):
sudo rm -ri ~/.Trash
Press the Return key on your keyboard..
You should first be prompted for your account’s password; enter it, and press Return.
You should next be prompted to remove any files and folders in the .Trash folder, followed by the .Trash folder itself. Type yes and return at each prompt. (This is a great place to notice if you’ve entered anything incorrectly above, too, and to press Control-C to halt the removal if you have.)
Now Log out of your OS X account ( > Log Out [user name], which closes all programs) and log back in. The problem should be solved, as OS X will create a new .Trash folder with the correct permissions.
If you continue to have problems, you may have permissions problems on mounted drives. You can repeat the above operation for each volume, which contains a hidden top-level .Trashes folder with separate folders for each user in OS X.
In step 3, instead of ~/.Trash, you use each volume’s name instead. In OS X, you can type df -H to find the names of each volume, which are listed under a Mounted On column in form /Volumes/ plus the drive’s name.
Unix doesn’t recognise spaces in names as part of the name unless they’re handled carefully, by putting a backslash in front of them, such as /Volumes/My\ Main\ Backup\ Drive. You can avoid having to do this formatting by dragging the volume in question into the Terminal window after entering the command for step 2:
Type: sudo rm -ri plus a space (tap the spacebar).
Drag the volume onto the Terminal window, and it inserts the properly formatted volume name.
Now press Delete to remove a space after the drive’s name that’s automatically inserted, and add /.Trashes
Now log out of your account and back in, and you should have your Trash folder restored to normal. (From Macworld.)

Five Tip Friday ~ Photos on Mac and iOS


Show the Sidebar
Show the Sidebar

1/ Find your images on a map — With the Info pane visible (from the Windows menu, choose Info), any image, video, or multiple selection that contains geotagging information will appear on a map at the pane’s bottom. With nothing selected, the Info pane shows the coarse placement of all photos in your library. You can zoom in to see fine detail about where images are clustered, but there’s no way to select a moment from that map – an oversight that will hopefully get corrected one day.
When viewing moments, if there are one or more geotagged media items in the set, the label for that place or range of places appears as the moment name in bold. To the right of the moment’s name, a broader place name appears in fainter type. Click that, and a full-window map shows all the moment’s photos.

2/ Organisation versus iPhoto — If you aren’t seeing a list of albums and other special items at the left of Photos, choose View > Show Sidebar.

3/ Time increments for Moments — You can show larger increments of time, up to years, and click the location. You can opt to show in larger or smaller groups by checking or unchecking the Summarize Photos option in Photos > Preferences in the General pane. (Photos automatically identifies moments: there’s no way to override and create them yourself.)

4/ Share photos online on Mac and iOS — iCloud Photo Sharing is a private and secure way to share digital memories with certain people. When you create or subscribe to a shared album, it appears on all of your devices. iCloud Photo Sharing does not count against your allotted storage space for free iCloud accounts, so it’s free.
Turn on iCloud Photo Sharing on all your devices (this has nothing to do with iCloud Photo Library). In Photos for Mac, choose Photos > Preferences and in the iCloud pane, turn on iCloud Photo Sharing. On an iOS device, tap Settings and then scroll down until you see Photos & Camera. Give it a tap and on the next screen, tap the switch next to iCloud Photo Sharing (it turns green).
Creating (and adding content to) shared albums is mercifully simple: in Photos on Mac, select an album or some thumbnails. Click the share icon in Photos’toolbar and choose iCloud Photo Sharing. In the resulting sheet, click New Shared Album, and then on the next sheet, name the album and invite someone to subscribe to it by entering their name, email address, or cell phone number into the To field. In the Comment field, enter a description of the goodies you’re about to share.
When you’re finished filling out the all the fields, click Create. Your invitees promptly receive an email invitation to subscribe to your album. Once they click the Subscribe button in the email, the shared album appears in Photos’ Shared view on all the devices on which they’ve turned on iCloud Photo Sharing. Creating a shared album in Photos for iOS works the same way, though you can’t select a whole album for sharing: You have to select individual thumbnails instead (bummer!).
To like and comment on an item in a shared album in Photos for Mac, open the album, double-click a picture or video and then click the “+” icon that appears in the picture’s lower-left corner (it looks like a thought bubble). When you do, the comment sheet shown below appears. Click the smiley-face icon to like it, or click in the comment field and enter something pithy. Click Send, and Photos adds your comment to the list.
To like an image or add and view comments in Photos for iOS, tap to open the shared album, and then tap the picture itself to open it. Beneath the picture, you see controls that let you like the image, view comments, and add your own. To delete a comment, tap and hold your finger down on it, and then tap the Delete button that appears just above the comment. (There’s more on this at Macworld, by Lisa Snider.)

5/ Eight ways to get photos onto your Mac and iDevice — There are several convenient sidedoors into Photos that work whether the program is running or not. My favourite on Mac is Image Capture, an Apple app already on every Mac. Macworld has a rundown.